 Scis
ScisLive effects
An effect changes how an object looks without changing the object itself. The path, the group or the piece of type stays exactly as you drew it, and the effect is recomputed on top every time you move a point or edit a value. Effects stack in the Appearance panel, so you can pile several on one object, reorder them and take any of them off again.
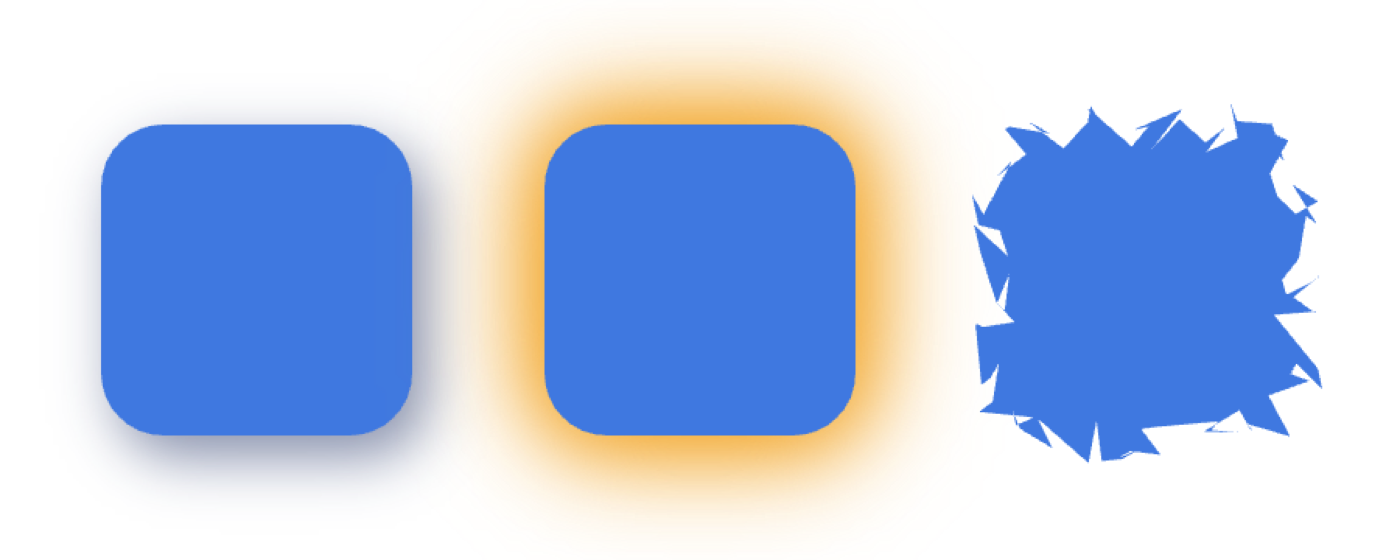
Live effects and the appearance stack
Every effect in Scissor is live and non-destructive. It sits above the object's fills and strokes in the Appearance panel (⇧F6) and runs over the whole object each time the artwork or the effect changes. Because the original path is untouched underneath, you can keep editing anchor points, swap the fill colour or retype the words, and the effect follows along. Reach for an effect whenever you want a look, a shadow, a bend, a rounded corner, that you might change your mind about later, rather than committing to it by hand.
Order matters
Effects run from the bottom of the stack upwards, and the panel lists them top first, above the fills and strokes. The order changes the result: a blur under a drop shadow softens the shape before the shadow is cast, while the same two the other way round casts a sharp shadow and then blurs the whole lot. If an effect is not doing what you expect, its position in the stack is the first thing to check.
Adding, editing and removing effects
From the Effect menu
Select an object, then pick an effect from the Effect menu. Items that open a dialog show a Preview as you change their values, so you can judge the result on the canvas before you commit; the whole edit lands as a single step in the history rather than one step per keystroke. A short version of the menu (Drop Shadow, Outer Glow and Gaussian Blur, plus Clear Effects) also sits in the canvas right-click menu under Effect.
In the Appearance panel
Each effect on the selected object gets its own row in the Appearance panel, marked with an fx badge. Click the effect's name to reopen its options and change them. Click the cross at the end of the row to remove that one effect. To strip every effect from the selection at once, use Effect › Clear Effects.
In the Effects panels
The Window › Effects group gathers the effects into one panel for each part of the Effect menu: Stylize, Blur, Distort & Transform, Path, Pathfinder and Warp, with the 3D panel alongside. Each panel lists that group's effects with a switch to turn one on or off and its settings just below, all edited live on the selection. It is a quicker way to try an effect and adjust its values than opening a dialog each time. Turning a switch off takes that effect back off the object. When an object carries more than one effect of the same kind, the panel edits the first of them and the Appearance panel still shows the whole stack.
Stylize: shadows, glows and edges
The Effect › Stylize submenu holds the everyday finishing effects.
| Effect | What it does, and when to use it | Main options |
|---|---|---|
| Drop Shadow | Casts an offset, blurred copy of the object behind it. Use it to lift a shape, a card or a piece of type off the background. | X and Y offset, Blur, Colour, Opacity. |
| Outer Glow | Spreads a soft halo of colour outward from the object's edge. Reach for it for a neon sign, a highlight, or a glow around a light source. | Blur, Colour, Opacity. |
| Inner Glow | Fades a colour inward from the edge instead of outward, so the light sits inside the shape. Use it to hollow a shape out or suggest an inset, lit rim. | Blur, Colour, Opacity. |
| Feather | Fades the object's own edge to transparent over a radius. Use it for a soft-edged shape or a simple vignette. | Feather Radius. |
| Round Corners | Rounds every corner of the path to one radius. Use it to soften the points of a star, a polygon or a hand-drawn path without redrawing it. | Radius. |
| Scribble | Fills the shape with a back-and-forth run of strokes, as though sketched by hand. Good for a loose, drawn-in fill or a marker-pen look. | Angle, Spacing, Stroke Width, Variation (how much the strokes wander, 0 to 100%). |
Blur
Effect › Blur › Gaussian Blur softens the whole object by a Radius you set in pixels. Because it stays live, you can raise or lower the radius at any time. Use it for a soft, out-of-focus background, or as a quick soft shadow shape on its own.
Distort and transform
The Effect › Distort & Transform submenu reshapes the outline while keeping the underlying path editable.
| Effect | What it does, and when to use it | Main options |
|---|---|---|
| Free Distort | Drags the four corners of the object's box in a small preview, and the artwork follows in perspective. Use it to fake a perspective, such as a label sitting on an angled surface. A Preview switch shows the result on the canvas while you drag, and Reset returns the corners to square. | The four corner handles, Preview, Reset. |
| Pucker & Bloat | Bends the segments between anchor points either inward, pulling the outline into spikes (pucker), or outward, pushing it into bulges (bloat). Use it for star bursts, blobs and soft petal shapes. | Amount, from puckered through to bloated. |
| Roughen | Breaks the outline into small random movements, either sharp or smoothed. Use it for a torn-paper edge or a rougher, hand-drawn line. | Size (how far points move), Detail (how densely), Points: Smooth or Corner. |
| Transform | Scales, moves and rotates the object as an effect, and can leave a set of copies behind. Use it for an editable row or ring of repeats, or to nudge and resize a shape without touching its real geometry. | Scale Horizontal and Vertical, Move Horizontal and Vertical, Rotate, Copies (0 to 200). |
| Tweak | Shifts anchor points and their control handles by a random amount. Use it to knock a too-perfect shape slightly out of true. | Horizontal and Vertical amount, and whether to move Anchor Points, Control Points, or both. |
| Twist | Turns the inside of the shape more than its edges, winding it into a swirl. Use it for a spiral or a whirlpool. | Angle. |
| Zig Zag | Turns straight segments into regular zig-zags (Corner) or waves (Smooth). Use it for a wavy underline, a ric-rac border or a jagged edge. | Size, Ridges per segment, Points: Corner or Smooth. |
Path
The Effect › Path submenu reworks the object's outline while leaving the source editable.
| Effect | What it does, and when to use it | Main options |
|---|---|---|
| Offset Path | Grows or shrinks the outline by a set distance. A positive offset spreads it outward, a negative one pulls it in. Use it for a live outline around type or a shape that keeps pace as you edit. | Offset, Joins: Miter, Round or Bevel. |
| Outline Object | Adds an Offset Path effect set to zero, turning the object (live type included) into an outlined path so later effects have a real path to act on. | None. |
| Outline Stroke | Turns the stroke into a filled shape as an effect. Use it when you want to fill a stroke with a gradient, or feather or distort a stroke that is otherwise a plain line. | None. |
Pathfinder
The Effect › Pathfinder submenu combines the shapes inside a group with a shape mode, but keeps them as separate, editable paths underneath. Apply it to a group and the combined result is what you see, while each member can still be moved or recoloured. Use it to try a combination without committing to it the way the Pathfinder panel would.
| Mode | Result |
|---|---|
| Add | Merges the group's shapes into one region. |
| Intersect | Keeps only where the shapes overlap. |
| Exclude | Keeps everything except where they overlap. |
| Subtract | Removes the front shapes from the back one. |
| Minus Back | Removes the back shapes from the front one. |
Warp
Effect › Warp bends the object along one of a set of preset shapes, and stays live so you can keep editing the artwork underneath. Use it to curve a headline into an arch, wave a banner, or push a flat block into a bulge, without giving up the ability to change the words or the colours.
The menu offers ten styles directly (Arc, Arch, Bulge, Flag, Wave, Fish, Rise, Fisheye, Inflate and Squeeze). Warp Options… opens the full set, which adds Arc Lower, Arc Upper, Shell Lower and Shell Upper, and lets you dial in the amount:
- Bend
- How strongly the shape bends, from -100% to 100%.
- Horizontal
- Leans the bend to one side, from -100% to 100%.
- Vertical
- Tips the bend up or down, from -100% to 100%.
The same warp styles can be applied as a reshaping envelope instead, which changes the path itself rather than staying live: see Envelope Distort. The Warp tool and the other liquify tools reshape by dragging on the canvas and are covered under the tools reference.
3D and Materials
Effect › 3D and Materials turns a flat shape into a solid: a plane, an extrude and bevel, a revolve or an inflate. Like the others it is a live effect, so the flat path stays there to edit and the solid rebuilds when you change it. The depth, bevel, rotation, lighting and surface are set in the 3D and Materials panel. Because it has more controls than a single dialog, 3D has its own page: see 3D.
Turning effects into artwork
An effect stays live for as long as you want it. When the look is settled and you need the result as plain, editable paths, for example to hand the file on or to reshape the effect's output by hand, choose Object › Expand Appearance. It bakes the whole appearance stack, effects included, down into ordinary artwork. This cannot be edited as an effect afterwards, so expand only once you are sure. To take effects off without baking anything, remove them one at a time in the Appearance panel or clear them all with Effect › Clear Effects.
The Effect menu also lists Rasterize, which is not a live effect: it converts the selection into pixels there and then. Painting and pixel layers are covered on the Pixel layers page.