 Scis
ScisDocuments and artboards
A document is what you open, draw in and save. Every document holds one or more boards: the rectangles that mark out the artwork that prints or exports. This page covers starting a document and setting its size, changing that setup later, and working with boards, from a single page to a set of them in one file. In the shortcuts below, ⌘ is Ctrl on Windows and Linux, and ⌥ is Alt.
Starting a new document
File › New… (⌥⌘N) opens the New Document dialog. The left of the dialog is a shelf of ready-made presets; the right, under Preset Details, is where you name the document and set its exact size, units, orientation, number of boards, bleed and colour handling. Pick a preset to fill those fields, adjust anything you want, then press Create. Close leaves without making a document.
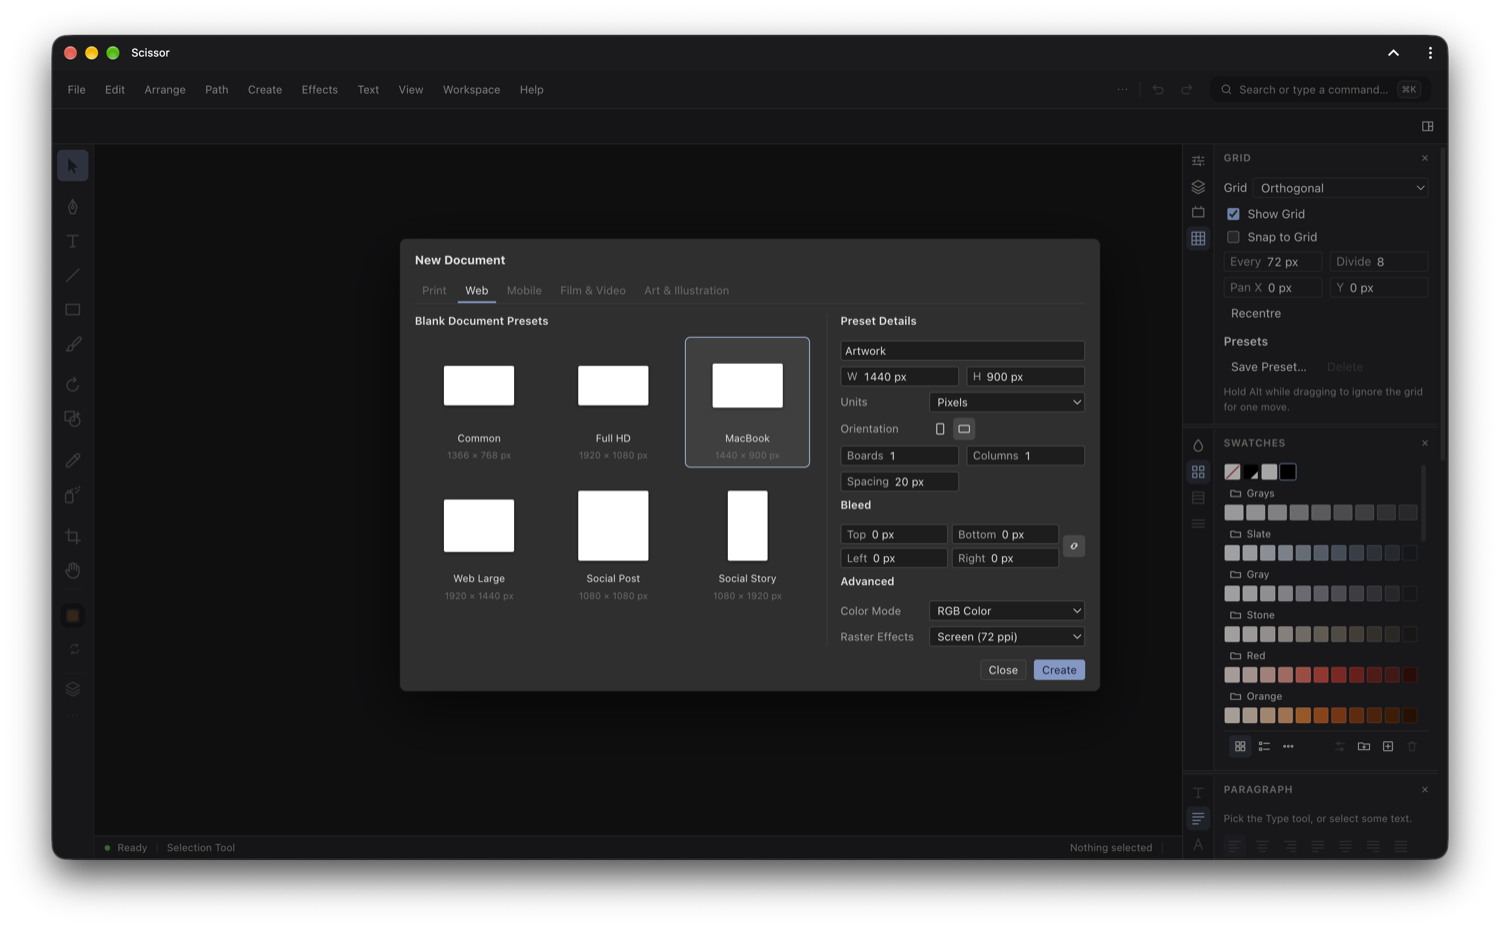
Blank document presets
The tabs across the top group the presets by the kind of work they suit. Click a tab to show its cards, then click a card to load its size, units and (for print) its bleed. Double-clicking a card creates the document straight away.
| Group | What it holds |
|---|---|
| Letter, Legal, Tabloid, A3, A4, A5 and Business Card, in inches or millimetres, each with a standard print bleed already set. | |
| Web | Common screen and desktop sizes in pixels: 1366 × 768, Full HD (1920 × 1080), a laptop size, a large web size, and square and tall social sizes (1080 × 1080 and 1080 × 1920). |
| Mobile | Phone, large phone, tablet, large tablet and watch sizes in pixels, for interface work. |
| Film & Video | HDTV 1080p, HD 720p, UHD 4K and Cinema 2K frame sizes. |
| Art & Illustration | Poster, Postcard, a 1000 × 1000 square canvas, a 512 × 512 icon and a square sketchbook page. |
The presets are only a starting point. Nothing stops you typing a size no preset lists; leaving the fields as you set them simply means no card stays highlighted.
Name, size, units and orientation
The Name field sets what the document is called in its tab and in the exported file names. Below it, W and H are the width and height of a board. The Units menu chooses how those and the other measurements read: pixels, points, millimetres, centimetres, inches or picas. Changing units converts the numbers already in the fields rather than clearing them, so switching from millimetres to inches keeps the same real size.
The two orientation buttons, portrait and landscape, turn the size on its side. Pressing the one that does not match the current width and height swaps them; typing a new width and height that reverse the shape flips the orientation marker to match. Use this to lay out, say, an A4 page the tall way or the wide way without retyping the numbers.
Boards, Columns and Spacing
A document can start with more than one board. Boards sets how many to make, all the same size. Columns sets how many sit side by side before the next row begins, and Spacing is the gap left between them. Four boards with two columns make a two-by-two block; the same four with one column make a single stack. Each board is named Board 1, Board 2 and so on, and you can rename and rearrange them later.
This is how you begin a job that is really several pages or several sizes at once: a six-page booklet, or one file that carries a phone, a tablet and a desktop version of the same screen so they stay together and export in one pass.
Bleed
Bleed is an extra margin around a board, meant for print: artwork that runs to the edge is drawn out into the bleed so that when the paper is trimmed there is no white sliver left along the cut. The four fields set the top, bottom, left and right bleed separately. The link button between them, on by default, keeps all four equal, so typing one value fills the others; switch it off to set a different bleed on each side. The print presets come with a bleed already filled in; screen and video work usually needs none, so leave it at zero.
Advanced: colour mode and raster effects
Under Advanced are two choices that set the tone of the document. The colour mode is either RGB, for anything shown on a screen, or CMYK, for work headed to a commercial printer. Raster Effects sets the resolution at which effects that have to become pixels, such as a drop shadow, a blur or a glow, are rendered: Screen (72 ppi) for on-screen work, Medium (150 ppi), or High (300 ppi) for print. Set it to match where the artwork will end up so those effects are neither coarse nor needlessly heavy.
Changing the setup later
None of these choices are locked in at creation. File › Document Setup… (⌥⌘P) reopens the main settings for the document you are in: the units, the colour mode, the width and height of the active board, a single bleed value applied to all four sides, and the raster-effects resolution. Use it when a job changes shape partway through, for example when a screen mock-up needs to go to print and you switch it to CMYK, or when a board turns out to be the wrong size. To add boards, resize individual boards or set different bleeds per side after the fact, use the board tools described below rather than this dialog.
Boards
A board (an artboard) is a rectangle that defines a finished piece: its edges are what a print or an export is cropped to. Everything you draw lives on the shared canvas, but only what sits on a board is output. A document always has at least one board, and can have as many as the work needs. Several boards in one file is the way to keep related pieces together: the pages of a brochure, a poster and its social cut-downs, or a whole set of icons, all sharing the same colours, styles and symbols.
The Board tool
The Board tool (⇧O) edits boards directly on the canvas, the way the selection tool edits artwork. With it active:
- Add a board
- Drag out a rectangle on an empty part of the canvas. Hold ⇧ to keep it square as you drag, or ⌥ to draw it from the centre. A running size read-out follows the corner. A drag too small to be a board is discarded.
- Move a board
- Drag from inside a board to move it, with everything on it. Hold ⇧ to keep the move to one axis.
- Resize a board
- Drag one of the handles on the active board's edges or corners. Hold ⇧ on a corner to keep the board's proportions.
- Make a board active
- Click any board to select it. The active board shows its handles and its size.
- Delete a board
- With a board active, press Delete or Backspace. The last remaining board cannot be deleted, so a document always keeps one.
Double-clicking the Board tool opens the Board Options dialog for the active board, described below.
The Boards panel
Open it from Window › Boards. It lists every board by number, name and pixel size. Click a row to make that board active and fit it in the window at once, which is the quickest way to jump between the pages of a multi-board document. Double-click a row to open Board Options for it. The buttons at the foot of the panel add a new board and rearrange them all. New Board is also on the Object › Boards menu, which places a fresh board of the last one's size just to its right.
Board Options
Board Options sets one board's details by number rather than by dragging. It gives the board's Name, a Preset menu that resizes it to any of the built-in sizes, its Width and Height, its X and Y position on the canvas, and an orientation choice. Reach it by double-clicking the board's row in the Boards panel, by double-clicking the Board tool, or from Object › Boards › Board Options…. Naming boards well is worth the moment it takes: the names become part of the file names when you export, so cover and back export more usefully than Board 1 and Board 2.
The active board
One board is always the active one, and several commands work on it alone. Select › All on Active Board (⌥⌘A) picks up only the artwork on it. Each board carries its own grid, so the grid you set applies to the active board (see the Grids page). Printing prints the active board. Clicking a board with the Board tool, or a row in the Boards panel, is how you change which board is active.
Rearranging boards
Object › Boards › Rearrange All Boards…, or the Rearrange button in the Boards panel, tidies every board into a neat arrangement in one step, carrying each board's artwork along so nothing is left behind. The Layout menu offers a grid filled by row or by column, or a single row or column. Columns sets how many boards sit across a grid, and Spacing the gap between them. It is the way to bring order back to a file whose boards have drifted apart while you worked, or to line up a set that was drawn in no particular place.
Fitting a board in the view
To frame a board on screen, use View › Fit Board in Window (⌘0), which zooms the active board to fill the window. Fit All in Window (⌥⌘0) pulls back to show every board at once, handy for seeing a whole multi-board document. Actual Size (⌘1) sets the zoom to 100%, so a pixel on the board is a pixel on screen.
Each board exports on its own
Boards are the unit of output: an export writes one file per board, each cropped to that board's edges and named after it. That is what makes a multi-board file worthwhile. A set of icons drawn on their own small boards, or a phone, tablet and desktop layout on three boards, comes out as a tidy set of separate files in a single pass. Choosing formats and scales, exporting selected boards, and printing are all covered on the Open & export page; Export for Screens in particular lists your boards so you can write them all out together.